
Ok guys, I just made 3 stick horses and spent $1 per horse!!! I did use supplies I already had on hand at home, but most of you probably already have the same things laying around. The bonus was, the kids I gave them to loved them just as much as if I had purchased a store brand horse!
List of Supplies/Tools
Purchased:
- Felt -2 sheets of the same color for each horse (I paid $ .22 a sheet)
- White felt -1 sheet to make diamonds/blazes/markings
- Wiggle eyes (around $3 for enough to make 6 horses)
On Hand at Home:
- Needle and thread
- Scissors
- Hot glue gun
- Dremel
- Scrap paper to draw pattern
- Stick from our yard
- Rubberband
- Ribbon
- Yarn
- Old twin sized sheet
What I did
First I took a piece of scrap printer paper and drew my pattern. I basically made it as big as the paper would allow. If I were to do it over again, I would probably make the horse’s neck a little bit longer and thinner.

This is the pattern laid out on a sheet of red felt so you can see how it looks.
I cut out two of each piece (head, middle strip, and ears. Then I started to sew. I sewed it by hand but I’m guessing it would be quicker and easy to do up if you have a sewing machine. I sewed the two middle pieces together on the short end to create one long strip, and then sewed it along the edge of one head piece. Next I sewed it to the edge of the other head piece. I did have a small bit extra on the middle strip when I was done so I just trimmed that off.
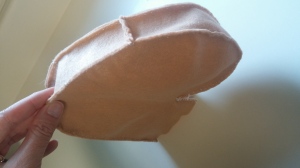
Sewn head inside out.
Next I turned them right side out and sewed on the ears.

After that, I used my hot glue gun to put on the wiggle eyes and diamonds/markings/spots. To make it even less expensive you could use black and white felt to make your own eyes or even sew on some big buttons you have on hand.
Next I worked on their mains. I used some yarn that I’ve had so long that I can’t even remember where it came from! I loosely wrapped it around my hand, tied one side with a piece of the same yarn, and then cut the loops opposite where I tied. This created a kind of mop effect that I sewed on the horse head.

I cut an old clean twin sized sheet into fourths and used one fourth to stuff each of the 3 horse heads. It wasn’t quite enough so I divided up the last fourth into 3 small pieces, stuffed that in, and it was just the right amount for what I wanted. It felt good to repurpose an old worn out sheet and not have to pay for stuffing! You could probably substitute an old t-shirt or something else soft like that for stuffing as well.
Then came the part I was most nervous about….attaching them to the stick! I had my kids sand down the sticks from our yard nice and smooth. They had fun working on that part. Then I took our Dremel and used it to make a grove all around the head end of each stick. I opted to use a rubber band, to secure the heads, but a string would probably work too. Since I was using the rubber band, I put that on the stick (doubled over already) before slipping the head on. Then I slipped on the head and slid the rubber band over the neck. The point is for the rubber band and some of the felt to go down into the grove so it is held in place and doesn’t just slide up and down the stick.

That seemed to work well for holding the heads in place. To make it look a little prettier, I tied a ribbon on over top of the rubber band. Then I stepped back to look at the finished job. It may not be perfect, but I thought they turned out awesome for the price!
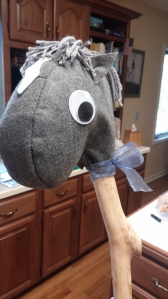
So, if you have a some time but not a lot of money, this might be a good project for you to do with your kids or even to make as Christmas gifts for the young kids on your shopping list.
This is a ToDoLady original pattern. Please feel free to copy this idea, however, I am not liable for any accidents or issues you may encounter while engaging in this activity.


